Showing posts with label HandsOn. Show all posts

Hello? Phone Project

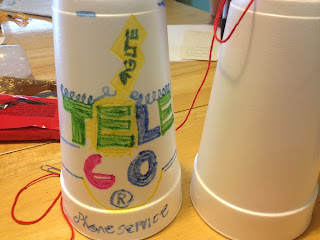
 In another Inventions & Technology project, we studied how the phone makes use of radio waves to transmit signals. The children tested one way lines and then connected all their cups to try and form a "Party Line"
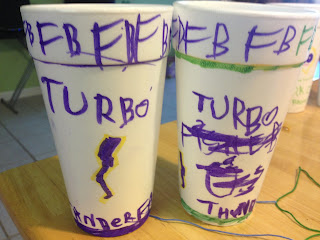
*Bonus Assignment: Create a phone company, logo and catchphrase then decorate your phone (cup) accordingly:

Chandler's TeleCo: 
"At the Speed of Light" 


Fisher's TurboPhone: 
"Faster Than Lightening & Thunder" 


Logan's Hello, Let's Talk: 
"Lightning Fast Phone Service" 


Transistor


In our Inventions & Technology class, we've been studying radio waves and the inventions that harnessed those waves for communication. One of our projects was to make a rudimentary transistor using a radio, electrical wires (we used clamps) and a metal file. Though the signal transmitted was nothing more than scratching and tapping, it was an enlightening moment that helped translate how radio waves work and how we make use of them.


BRAINS

In Anatomy, we studied the brain. Our assignment was to make a clay model of the brain, using variated colors to designate major sections. 

Chandler's Brain:

Fisher's Brain:
 

Logan's Brain:
 

Momma's Brain(actual size):

Pink Paintings

Riley paints with PINK
And more PINK
Occasionally Purple or Teal.
 But mostly, PINK


This is what we do not care for: watercolors
Here is what we prefer: Glitter & Acrylics


Sleepy Cat~ A Tiny Friend

Sleepy Cat (needs a nap)

 Start with a clean candy tin. We used a miniature one. 

 The pillow and blanket are made from ribbon. 

 Sleepy Cat is two pieces of felt, hand stitched together; wide awake wiggly eyes on one side, snoozy sleeping eyes on the other.

 Snoozer is Sleepy Cat's teddy-mouse. Smaller felt scraps stitched together, again with differing eyes to denote asleep/alertness.
 A small story book and a ball of yarn for playtime. 


All put together...


 ...and portable...


Eating Apples: You're Doing It Wrong

Watched this video on BuzzFeed awhile back. 
Decided to gave it a go. 
In fact, I bought apples just to try it.


It works. 

(and I did eat the seeds too... because someone once told me too...they're kind of 'almond-y')

DIY Laundry Detergent

DIY Laundry Detergent

"It's better, cheaper & smells fantastic...MAYBE" 

Basically, one of everything pictured(below):

Washing Soda
Borax
Baking Soda
Grated Pink Zote Soap (or FelzNaptha)
Epsom Salts & Scent (or scented softening crystals) (2 boxes equals proper amount)
Oxygenated Stain Remover
DIY Laundry Detergent Ingredients
I will start by saying that my results may be different than the glowing review of the recipe I followed because I used varied ingredients. I am not convinced that any one substitution made would change my overall experience with the results. The substitutions are as follows: 

1 Bar of Zote Soap instead of 2. The package looked like 2 bars in one wrapper, so we didn't bring enough home. I don't believe there would be a major difference even if the second bar was added because it seems that this soap doesn't dissolve very well before the washer has started- there are always chunks of it still floating about. 

Epsom Salts & Scent in place of softening crystals ~per another DIY recipe. Mixing essential oils with epsom salt was a prescribed substitute for using less chemical product and making the total price lower. No dramatic softening can be detected.  Any noticeable scent is from the Pink Zote soap. 

Competing brand of Oxygenated Stain Remover in place of OxiClean brand- for lower cost. 

One warning that I did not read anywhere was that the Zote soap would get so dangerously hot. 
Be Warned! 
 The recipe I've linked says heat it for a minute to dry it out... it took much more time than that. I would heat it and flake off the dry parts once it had cooled enough to touch, then heat again & repeat the crumbling process. 
Zote Soap Not Cotton Candy 
It cost a few cents less than $20  to follow an online recipe and give this fad a try.

According to the prescribed measurements, the cost came out to about $.07 per scoop. It is cheaper if you use only one scoop, but one scoop has not seemed to be in some of our loads.
Perhaps our water type has something to do with this.

At this point, my results have not been more remarkable than pr-emade detergents, even Value Brand powdered soaps, which if bought on sale comes out to roughly the same cost per load...  I have not come to the conclusion that it is both cheaper AND better  concurrently. Maybe cheaper but not better. Or better but not cheaper. Only, not both at the same time.

 We are still evaluating it on various types of laundry. Chandler believes it is a miracle concoction, as his baseball pants got pretty clean. The baby clothes with food stains weren't as easily cleaned. Before I give up on making it again, I am experimenting with water temp and scoop sizes. I will have to discover something dramatically different to warrant grating anymore Zote soap.

5 Gallon Container of DIY Detergent

Marzipan Cookies

Betty Crocker Marzipan Cookie Recipe 
Once upon a time, in the far away Land of Kentucky, under the floor beams of a Wesleyan church, in a magical place called the Night Kitchen (of Fellowship Hall),  Brother Ben and I worked long into the wee hours making miniature marzipan vegetables.

 Sir Chandler was turning 3 and had requested a "LarryBoy" cake... I'll leave the remaining dots for you to connect :) 
Marzipan VeggieTales & Larry Boy Cake
Marzipan candies call for Almond Paste, but Barren County, KY was barren of this ingredient...amongst many other things. 

So we bought almonds and made a rustic paste of our own. 

In a blender.

Hours of buzzing and blending and mulching and molding later... we had crafted several marzipan VeggieTales. 

It was a LOT of work for little vegetables. 

Sometimes, the experience of making an item is as much the reason for undertaking an endeavor as the anticipated joy of using or eating the item in question.
 In this case, I decided the  decorative nature of marzipan was its only redeeming value. I did not care for the taste. I was not a big fan of almonds in general- whole, crushed or as flavoring. And while it was an experience to be sure, it was not one I was eager to repeat. 

 I chose all future cake decorating projects to exclude a need for tiny marzipan anythings.

Join me now a decade later...

Sir Chandler is now 13,  I have grown to love almonds in all forms... and almond paste is readily available in all the grocery stores I frequent. 

I found this adapted recipe for marzipan cookies in my favorite Betty Crocker cookbook. I have known it was there for a long time... I cannot explain what compelled me to succumb to it yesterday. 

I just did. 

I think it all started with the 'fortune cookies' that we made earlier in the year... I only needed 1 Tbs of almond extract for those. I've been using up the remainder of the bottle ever since. As I was looking for something to make that only used a few ingredients, I noticed the recipe for these mini fruits did not require almond paste- only almond extract. 

The dough recipe is pretty simple.  
Marzipan Cookie Dough

The shaping of the fruit requires a little patience. 

Marzipan Cookie Fruits 

Because we had errands to run and baseball practice and because I didn't have colored sugar and spent even more time making a batch of each color, a great deal of time elapsed from the time I started making the cookies and the time I finished. 
Making colored sugar turns out to be incredibly easy.
  It was with a wry grin that I switched the oven off in the wee hours of the morning... leaving the cookies in the oven to finish and cool til the arrival of a more decent hour. 
"Good Morning, Cookies. I shall eat you with coffee after my nap."

No matter how much some things change, other things never do :) 
**The marzipan cookies spread a little during baking. A longer chill may have prevented this. 

MARZIPAN COOKIES

1 Cup Butter, softened
1/2 c Sugar
2.5 c All Purpose Flour
1 ts almond extract

Food Coloring

Cream butter & sugar
Add Flour & extract

Divide into 3 or 4 parts

Add food coloring

Form fruit shapes

Roll in colored sugar & paint with additional food coloring as desired

Chill 

Bake @ 300 degrees for about 30 minutes~ until set but not browned. 

*The book calls for cloves and cinnamon sticks for the stems and fruit accents- I used pecan slivers for lack of the prior

**Only after dividing the dough did I realize I had accidentally used half the amount of butter called for. To make up for it, I drizzled in coconut oil. This may account for more of the spreading in the oven. 


Search This Blog